麦克纳姆 TeleOp
麦克纳姆物理学
麦克纳姆驱动 (以下简称麦轮)是FTC® 中非常流行的驱动系统类型。麦轮传动系统支持完整运动。这意味着传动系统在旋转时能够向任何方向移动:向前、向后、左右、旋转时平移等。 这里有一个简洁的视频 演示了这种运动。
备注
一些常见的COTS麦轮传动系统套件是 goBILDA Strafer Chassis Kit 和 REV Mecanum Drivetrain Kit 。
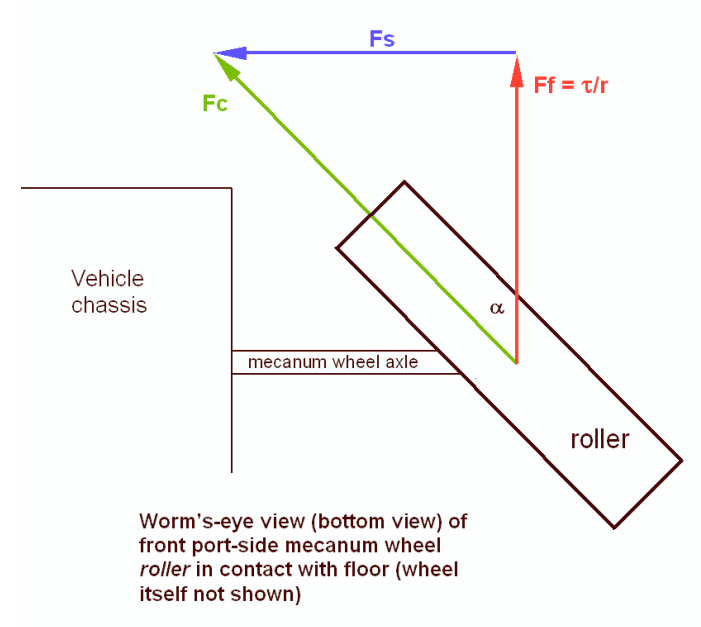
麦轮 滚轮与轮子的其他部分成 45 度角。由于这些滚轮与地面接触,而不是像 牵引轮 那样与固体接触,因此车轮产生的力不是与车轮方向平行的力,而是与平行线成 45° 角的力。根据车轮的驱动方式,力矢量的X或Y分量可以抵消,从而允许向任何方向运动。
使用矢量创建全方位运动
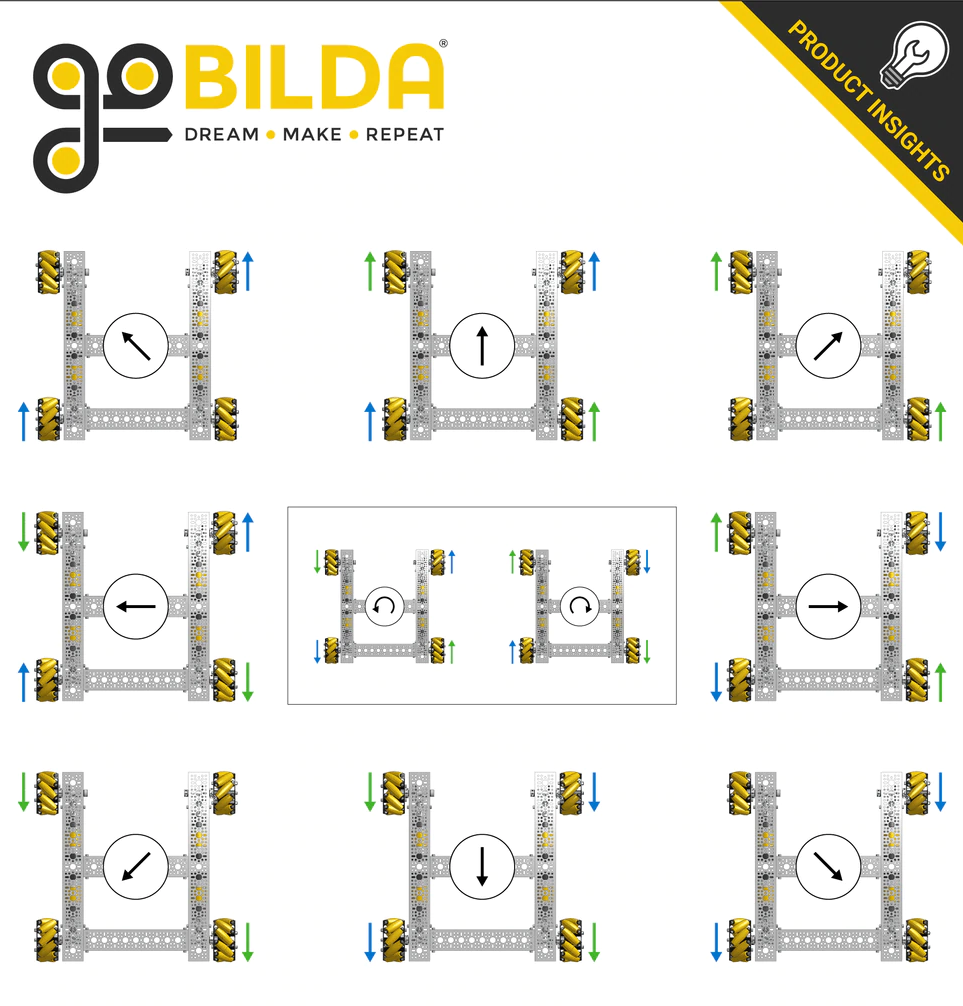
标准的麦轮驱动配置有4个以“X”形状定向的麦轮。这意味着当从上面看时,滚子是朝向中心的。这种配置允许人们将偏移滚子产生的力矢量相加,并推导出任何方向的运动。重要的是要注意,由于摩擦力,不可能在每个方向都进行完美的运动,因此 麦轮底盘 比起其他方向可以更快地向前/向后移动。平移和旋转相结合也会导致运动变慢。
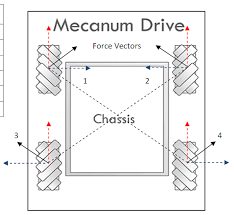
在上图中,向量1、2、3和4分别表示底盘向图像顶部行驶时由 麦轮 创建的力向量。所有电机都在向前行驶。蓝线和红线分别是它们的X和Y分量。以下是车轮必须如何驱动以实现不同运动的几个示例:
注意
强烈建议不要硬编码这些动作;下面描述了一种更好的方法,可以实现真正的完整运动,而且更加优雅。
推导麦克纳姆轮控制方程
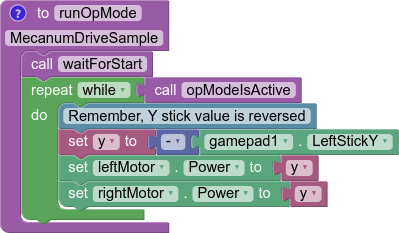
在推导麦轮方程之前,设想一个场景,你有一个2电机坦克底盘,你想用左摇杆Y轴来控制它前进/后退,用右摇杆X轴来控制它自转转动。电机的配置是,当底盘背对着你时,右电机的正方向是顺时针,而左电机相反。要控制只前进/后退运动,你只需要将电机功率设置为Y摇杆值(翻转符号,因为Y是反转的):
double y = -gamepad1.left_stick_y; // Remember, Y stick is reversed!

leftMotor.setPower(y);
rightMotor.setPower(y);
虽然起初添加旋转似乎是一项艰巨的任务,但实际上非常简单。你需要做的就是从右轮功率值中减去右摇杆的X值,然后将其添加到左轮功率值中:
double y = -gamepad1.left_stick_y; // Remember, Y stick is reversed!
double rx = gamepad1.right_stick_x;

leftMotor.setPower(y + rx);
rightMotor.setPower(y - rx);
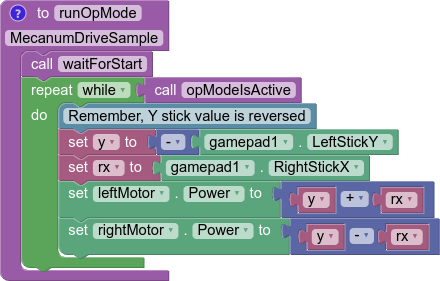
在这里,如果向前按压左摇杆,两个电机都会被馈送一个正值,导致机器人向前移动。如果向后按压,两个电机都会被馈送一个负值,导致机器人向后移动。类似的原理也适用于旋转:如果向右推右摇杆,左车轮会向前旋转,而右车轮向后旋转,导致旋转。相反的情况适用于向左推摇杆。如果两个摇杆同时被推,假设左Y摇杆在1,右X摇杆也在1,左车轮的值将是 \(1+1=2\) (在SDK中被裁剪成1),右车轮将是 \(1-1=0\) ,这会导致向右转向。
使用 麦轮 进行全向运动的原理与将转弯添加到坦克示例中的原理相同。根据车轮需要如何旋转以获得所需的运动,左摇杆的X值将被加减到每个车轮上。与转弯的唯一区别是,不是同一侧的车轮是相同的符号,而彼此对角线的车轮将是相同的符号。
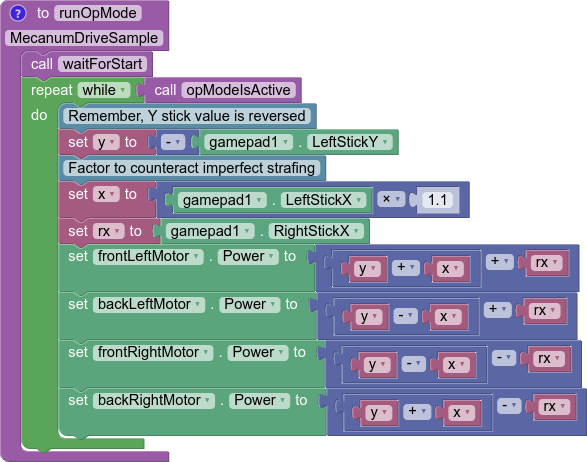
我们想要一个正的左摇杆X值与向右平移相关联。如果我们参考矢量图像,这意味着前左和后右需要向前旋转,而后左和前右需要向后旋转。因此,我们应该将X值添加到前左和后右,并从后右和前左减去它:
double y = -gamepad1.left_stick_y; // Remember, Y stick is reversed!
double x = gamepad1.left_stick_x;
double rx = gamepad1.right_stick_x;

frontLeftMotor.setPower(y + x + rx);
backLeftMotor.setPower(y - x + rx);
frontRightMotor.setPower(y - x - rx);
backRightMotor.setPower(y + x - rx);

重要
大多数FTC电机在默认情况下正功率时从它们的表面看是逆时针旋转的,但NeveRest除外。如果你的传动系统使用偶数个齿轮,这将逆转电机旋转的方向。
在大多数传动系统上,你需要反转左侧以获得正功率才能与大多数电机一起前进,并使用NeveRest反转右侧。电机变速箱和车轮之间的齿轮传动可能会交换这一点,goBILDA Strafer和REV Mecanum Drivetrain Kit就是这种情况。
这与坦克底盘示例相同,只是现在添加了4个电机和平移组件。与坦克示例类似,Y分量被添加到所有车轮上,右侧X (rx)被添加到左侧车轮上并从右侧减去。现在,我们添加了一个左侧X分量(x),允许我们向右平移。然而,在这样做的过程中,我们实际上允许向任何方向平移。如果你想想看,向左按压左侧操纵杆会反向做同样的事情,这就是向左平移所需要的。如果以45度按压,操纵杆的x和y分量将相等。这将导致两个对角线电机取消,允许对角线移动。同样的效果适用于操纵杆的每个角度。
现在我们有了一个正常运行的麦轮驱动程序,可以做一些事情来清理它。第一步是将左X值乘以某个值以抵消不完美的平移。这样做将使驱动器在非轴对齐方向上感觉更准确,并使以场为中心的驱动更准确。在本教程中,我们将使用1.1,但这实际上取决于驾驶偏好。
double y = -gamepad1.left_stick_y; // Remember, Y stick is reversed!
double x = gamepad1.left_stick_x * 1.1; // Counteract imperfect strafing
double rx = gamepad1.right_stick_x;
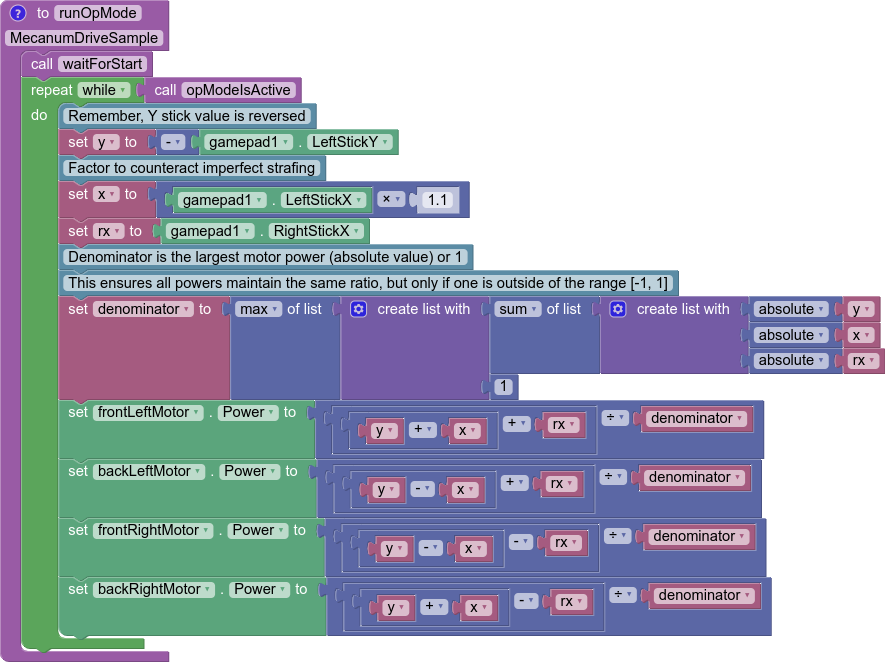
我们可以做的另一个改进是将值缩放到-1到1的范围内。
由于 SDK 只是会简单地将功率值剪切(限制)到该范围内,因此除非我们主动将所有数字放回该范围内,同时保持计算出的比率,否则就会导致丢失各个轮子功率值的比例关系。例如,如果我们计算出 0.4、0.1、1.1 和 1.4 的值,它们将被剪切为 0.4、0.1、1.0 和 1.0,这不是相同的比率。因此,当最大功率值的绝对值超过 1 时,我们需要将它们全部除以最大功率值的绝对值:
// Denominator is the largest motor power (absolute value) or 1
// This ensures all the powers maintain the same ratio, but only when
// at least one is out of the range [-1, 1]
double denominator = Math.max(Math.abs(y) + Math.abs(x) + Math.abs(rx), 1);
double frontLeftPower = (y + x + rx) / denominator;
double backLeftPower = (y - x + rx) / denominator;
double frontRightPower = (y - x - rx) / denominator;
double backRightPower = (y + x - rx) / denominator;
确保在电机上设置功率,并在 opmode 模式的每个循环中更新功率!
以机器人视角操控模式的最终示例代码
package org.firstinspires.ftc.teamcode;

import com.qualcomm.robotcore.eventloop.opmode.LinearOpMode;
import com.qualcomm.robotcore.eventloop.opmode.TeleOp;
import com.qualcomm.robotcore.hardware.DcMotor;
import com.qualcomm.robotcore.hardware.DcMotorSimple;

@TeleOp
public class MecanumTeleOp extends LinearOpMode {
    @Override
    public void runOpMode() throws InterruptedException {
        // Declare our motors
        // Make sure your ID's match your configuration
        DcMotor frontLeftMotor = hardwareMap.dcMotor.get("frontLeftMotor");
        DcMotor backLeftMotor = hardwareMap.dcMotor.get("backLeftMotor");
        DcMotor frontRightMotor = hardwareMap.dcMotor.get("frontRightMotor");
        DcMotor backRightMotor = hardwareMap.dcMotor.get("backRightMotor");

        // Reverse the right side motors. This may be wrong for your setup.
        // If your robot moves backwards when commanded to go forwards,
        // reverse the left side instead.
        // See the note about this earlier on this page.
        frontRightMotor.setDirection(DcMotorSimple.Direction.REVERSE);
        backRightMotor.setDirection(DcMotorSimple.Direction.REVERSE);

        waitForStart();

        if (isStopRequested()) return;

        while (opModeIsActive()) {
            double y = -gamepad1.left_stick_y; // Remember, Y stick value is reversed
            double x = gamepad1.left_stick_x * 1.1; // Counteract imperfect strafing
            double rx = gamepad1.right_stick_x;

            // Denominator is the largest motor power (absolute value) or 1
            // This ensures all the powers maintain the same ratio,
            // but only if at least one is out of the range [-1, 1]
            double denominator = Math.max(Math.abs(y) + Math.abs(x) + Math.abs(rx), 1);
            double frontLeftPower = (y + x + rx) / denominator;
            double backLeftPower = (y - x + rx) / denominator;
            double frontRightPower = (y - x - rx) / denominator;
            double backRightPower = (y + x - rx) / denominator;

            frontLeftMotor.setPower(frontLeftPower);
            backLeftMotor.setPower(backLeftPower);
            frontRightMotor.setPower(frontRightPower);
            backRightMotor.setPower(backRightPower);
        }
    }
}

以场地坐标系的操控模式
在以场地坐标系的麦轮驱动模式中,平移操纵杆控制的是机器人相对于场地的方向,而不是机器人自身参考系的方向。有些驾驶员更喜欢这种操作模式,这样可以使一些规避动作变得更容易,因为在向指定方向平移的同时可以更容易地旋转。为此,操纵杆的 x/y 分量会基于机器人的角度进行旋转,这里机器人的角度由 IMU 提供。
Control Hubs(以及旧型号的Expansion Hub)内部有一个IMU。与大多数其他硬件不同,建议在使用 hardwareMap.get() 之外,额外写几行配置 IMU 的代码,以便正确开始使用 IMU。请注意,默认情况下,在RC上创建新 configure 文件时,会自动配置为名叫 imu 的设备。有关详细信息,请 参阅FTC文档页面,其中涵盖了IMU接口及其参数 。此处初始化IMU的方式是:
// Retrieve the IMU from the hardware map
imu = hardwareMap.get(IMU.class, "imu");
// Adjust the orientation parameters to match your robot
IMU.Parameters parameters = new IMU.Parameters(new RevHubOrientationOnRobot(
        RevHubOrientationOnRobot.LogoFacingDirection.UP,
        RevHubOrientationOnRobot.UsbFacingDirection.FORWARD));
// Without this, the REV Hub's orientation is assumed to be logo up / USB forward
imu.initialize(parameters);
每个循环都需要读取角度。除此之外,虽然 IMU 在不同操作模式(包括自动程序和远程操作)之前切换的时候不会改变角度为零的位置,但额外增加一个重置角度的按键操作对抵消漂移很重要,因为零点位置会因某些类型的断连而发生变化。
备注
当调用 initialize 时,BNO055 对象将重置 IMU 的零点。不建议在新的代码中使用 BNO055 类。从 SDK v8.1 起,新增的 IMU 类没有这种行为,应当用 IMU 类来代替 BNO055。
// This button choice was made so that it is hard to hit on accident,
// it can be freely changed based on preference.
// The equivalent button is start on Xbox-style controllers.
if (gamepad1.options) {
    imu.resetYaw();
}

double botHeading = imu.getRobotYawPitchRollAngles().getYaw(AngleUnit.RADIANS);
然后,需要根据机器人的航向角度,把平移操纵的摇杆读数值进行反向旋转。IMU 返回航向角度,但我们需要根据机器人的旋转角度来反向旋转运动,因此这里角度需要取其负值。如果将操纵杆值看作一个向量,在二维中旋转一个向量需要以下公式(在此证明 ),其中 \(x_1\) 和 \(y_1\) 是原始向量的分量,\(\beta\) 是旋转的角度,\(x_2\) 和 \(y_2\) 是结果向量的分量。
// Rotate the movement direction counter to the bot's rotation
double rotX = x * Math.cos(-botHeading) - y * Math.sin(-botHeading);
double rotY = x * Math.sin(-botHeading) + y * Math.cos(-botHeading);
然后,这些旋转后的值可以放入前面提到的麦轮运动公式中。
double denominator = Math.max(Math.abs(rotY) + Math.abs(rotX) + Math.abs(rx), 1);
double frontLeftPower = (rotY + rotX + rx) / denominator;
double backLeftPower = (rotY - rotX + rx) / denominator;
double frontRightPower = (rotY - rotX - rx) / denominator;
double backRightPower = (rotY + rotX - rx) / denominator;
以场地坐标系的操控模式的最终示例代码
package org.firstinspires.ftc.teamcode;

import com.qualcomm.robotcore.eventloop.opmode.LinearOpMode;
import com.qualcomm.robotcore.hardware.IMU;
import com.qualcomm.robotcore.eventloop.opmode.TeleOp;
import com.qualcomm.robotcore.hardware.DcMotor;
import com.qualcomm.robotcore.hardware.DcMotorSimple;
import com.qualcomm.hardware.rev.RevHubOrientationOnRobot;
import org.firstinspires.ftc.robotcore.external.navigation.AngleUnit;

@TeleOp
public class FieldCentricMecanumTeleOp extends LinearOpMode {
    @Override
    public void runOpMode() throws InterruptedException {
        // Declare our motors
        // Make sure your ID's match your configuration
        DcMotor frontLeftMotor = hardwareMap.dcMotor.get("frontLeftMotor");
        DcMotor backLeftMotor = hardwareMap.dcMotor.get("backLeftMotor");
        DcMotor frontRightMotor = hardwareMap.dcMotor.get("frontRightMotor");
        DcMotor backRightMotor = hardwareMap.dcMotor.get("backRightMotor");

        // Reverse the right side motors. This may be wrong for your setup.
        // If your robot moves backwards when commanded to go forwards,
        // reverse the left side instead.
        // See the note about this earlier on this page.
        frontRightMotor.setDirection(DcMotorSimple.Direction.REVERSE);
        backRightMotor.setDirection(DcMotorSimple.Direction.REVERSE);

        // Retrieve the IMU from the hardware map
        IMU imu = hardwareMap.get(IMU.class, "imu");
        // Adjust the orientation parameters to match your robot
        IMU.Parameters parameters = new IMU.Parameters(new RevHubOrientationOnRobot(
                RevHubOrientationOnRobot.LogoFacingDirection.UP,
                RevHubOrientationOnRobot.UsbFacingDirection.FORWARD));
        // Without this, the REV Hub's orientation is assumed to be logo up / USB forward
        imu.initialize(parameters);

        waitForStart();

        if (isStopRequested()) return;

        while (opModeIsActive()) {
            double y = -gamepad1.left_stick_y; // Remember, Y stick value is reversed
            double x = gamepad1.left_stick_x;
            double rx = gamepad1.right_stick_x;

            // This button choice was made so that it is hard to hit on accident,
            // it can be freely changed based on preference.
            // The equivalent button is start on Xbox-style controllers.
            if (gamepad1.options) {
                imu.resetYaw();
            }

            double botHeading = imu.getRobotYawPitchRollAngles().getYaw(AngleUnit.RADIANS);

            // Rotate the movement direction counter to the bot's rotation
            double rotX = x * Math.cos(-botHeading) - y * Math.sin(-botHeading);
            double rotY = x * Math.sin(-botHeading) + y * Math.cos(-botHeading);

            rotX = rotX * 1.1;  // Counteract imperfect strafing

            // Denominator is the largest motor power (absolute value) or 1
            // This ensures all the powers maintain the same ratio,
            // but only if at least one is out of the range [-1, 1]
            double denominator = Math.max(Math.abs(rotY) + Math.abs(rotX) + Math.abs(rx), 1);
            double frontLeftPower = (rotY + rotX + rx) / denominator;
            double backLeftPower = (rotY - rotX + rx) / denominator;
            double frontRightPower = (rotY - rotX - rx) / denominator;
            double backRightPower = (rotY + rotX - rx) / denominator;

            frontLeftMotor.setPower(frontLeftPower);
            backLeftMotor.setPower(backLeftPower);
            frontRightMotor.setPower(frontRightPower);
            backRightMotor.setPower(backRightPower);
        }
    }
}